Every beginner welder knows that welding lenses are incredibly important, but so few know the first thing about them.
They stick with whatever came with the mask they bought, rarely check ratings — or even know they exist — and don’t know how to care for them.
Many times I see someone replace a whole mask just to change the lens.
I figured enough was enough. Here’s everything you need to know about welding lenses.
- What are welding lenses used for?
- Most Frequently Asked Questions About Welding Lens
- How do you install welding lenses?
- How do you change welding lenses?
- How do you keep welding lenses from fogging up?
- How do you clean a welding lens?
- Which welding diopter should you pick?
- How do you choose a welding lens?
- Which are the best welding lenses for pipeliner hoods?
- Which are the best auto-darkening 2×4 welding lenses?
- Which welding lens is the darkest?
- What shade of welding lens do you need to look at the sun?
- Final Thoughts
What are welding lenses used for?
The intense light given off by welding machines can easily blind a person very quickly if you’re not careful.
Welding lenses not only protect your eyes but let you see what’s going on.
They’re one of the most important pieces of PPE (personal protective equipment) a welder will ever own.
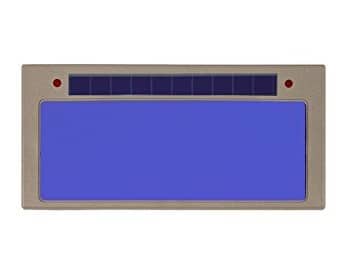
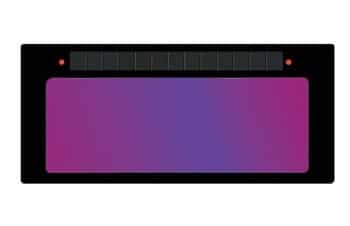
When we refer to welding lenses, we can be referring to a few things. Most welding helmets actually have two lenses — a shaded lens, and a protective front lens.
The shaded lens is typically made of tinted glass. This is what protects your eyes from the light and radiation coming from the weld site.
The front lens protects the lens from dust and debris and is usually made of plastic.
Welding lenses are necessary for all types of welding. Looking at the sparks and light from a welding machine at a distance is OK, but at the close range of the welder doing the work, it’s literally blinding.
The lens and mask also physically protect the eyes from any stray sparks or slag that might hit them.
But, like anything, not all lenses are made equally. Not only do the levels of tinting change, but the quality and material of the lens can also affect how well you can see.
Some lenses let you see remarkably clearly; others can make it almost impossible to see what you’re doing properly.
The type of lens you need will also change depending on the type of welding being performed.
Different types of welding require stronger or lighter amounts of tint for safety and precision.
With so much information around, let’s work through the most frequently asked questions about welding lenses.
Most Frequently Asked Questions About Welding Lens
What follows are the top ten most frequently asked questions about welding lenses.
All of this information is incredibly important for the proper and effective use and upkeep of your welding lenses.
How do you install welding lenses?
Welding helmets come with lenses pre-installed. Additional types of lenses can be added, such as cheater lenses or gold lenses, to help with different tasks.
All welding lenses are designed to be incredibly intuitive and easy to install.
While there will be some variation from helmet to helmet, the process looks like this:
To add additional lenses, such as cheater lenses so you don’t need to wear prescription glasses while working:
- Additional lenses are installed on the inside of the helmet, not the outside.
- Looking into the back of the helmet, you should see brackets or tabs on either side of the lens mount.
- Clip the lens into the brackets and ensure it’s tightly in place.
- Test the helmet on and look around. Make sure the new lens isn’t sliding around or obscuring your vision.
To add a shaded lens:
- Remove the shade frame from the helmet. There is usually a finger tab that lets you pull the frame loose from the mask.
- Place the lens into the frame. There may be tabs in the frame that help hold the lens in place.
- Return the frame to the helmet.
If you have a gold welding lens you want to add, you’ll notice one side is notably shinier than the other.
This shiny, more reflective side faces away from you, towards your workspace. The mat side faces towards you.
To add a clear lens:
- Sometimes clear lenses are part of the shaded lens assembly; in this case, follow the steps above.
- In most cases, the clear lens will have its own finger tab to allow you to pull the lens out of its clips or bracket without removing the shaded lens.
- Remove the protective layer from the replacement lens and clip it into the brackets.
Keep in mind, that not all welding masks allow you to add lenses.
Particularly cheap models, such as those which come bundled with some welding machines, may not allow you to add or replace lenses.
How do you change welding lenses?
There are a few reasons to change the welding lens. The most common is to change the clear protective lens after it gets too dirty.
Automatic lenses with solar batteries can need replacing if the batteries stop charging properly.
Scratches in shaded lenses and gold lenses will render them effectively useless.
Changing a lens luckily isn’t difficult. The exact process will change depending on the type of helmet you have.
Different helmets use different assemblies to mount the lens in place.
In general, these are the steps you need to follow:
- Locate the finger/thumb tab near the lens frame.
- Apply gentle pressure to pull the frame away/loose from the mask.
- Remove the old lenses you’re wanting to replace.
- Remove the protective film from your new lenses and place them into the lens frame.
- Remount the lens frame into the mask.
Some lenses don’t have frames; instead, they’re removed and installed as a single unit right into the mask (such as automatic lenses with solar recharging batteries).
These are usually held in place with a clip system and are still removed using a finger tab.
Some helmets have their lens frames screwed into place.
These screws will need to be removed before the lenses can be replaced.
Here’s a Youtube video that quickly shows you how you can change lenses on the mask.
Be careful when installing your shade lenses.
Chips, cracks, and scratches on these can seriously compromise their ability to protect your eyes and can render them useless.
How do you keep welding lenses from fogging up?
A common problem for welders is their lenses fogging up while they work. This renders them effectively blind, preventing them from working properly.
Unfortunately, the most popular answer you’ll find to this online is “don’t breathe”, but that’s hardly helpful.
Fortunately, there are some practical — and much safer — options.
- Shampoo. Dab a wash rag with shampoo and gently wipe it over the front and back of the lens. Make sure to cover the entire lens. Rinse off any bubbles with water, but leave the film coating in place. This is what will prevent the lens from fogging up.
- Shaving cream. As above. The film left by these products prevents moisture from your breath from fogging up the lens, allowing you to see clearly.
- Toothpaste. Same again. This is a popular option on car headlights as well.
- Adjust the mask distance. Some masks allow you to adjust the distance between your face and the mask. Adding a little bit of distance will let the moisture from your breath dissipate before it can condense on the lens. Obviously be careful when adjusting, as you obviously don’t want to allow toxic fumes from your weld to get to your face.
- Get a ventilator. Some higher-end masks and masks designed for heavy-duty welding come with ventilators. This will obviously prevent air from fogging up your lenses, as it’s drawn immediately down into the motor-powered ventilation system.
- Anti-fogging creams and wipes. There are various commercial products available on the market specifically to prevent fogging. Their effectiveness appears to be hit-or-miss for many people; some report that they work wonders, others that they do nothing. It can come down to whether the product is effective on plastic, as many clear lenses are plastic, not glass.
- Raw potato. Cut the potato in half and rub it over the lens. Like the shampoo and cream, it will create a film layer that prevents fogging.
- Anti-fogging film. The thin, adhesive film specifically designed to prevent fogging can be found in motorcycle shops
- Small fans. Small, clip-on fans placed at the top of the mask aiming down towards the lens can help prevent fogging. There are many brands and types available. Fans designed for paintball or welding are best.
How do you clean a welding lens?
Sometimes your inability to see while working has nothing to do with technology.
Welding lenses get exposed to a lot of dust and fumes. Predictably, they start to get dirty and cloudy after repeated use.
Fortunately, there are no special care instructions or products necessary for welding lenses.
You can keep most of the dust away by wiping the clear plastic lens with a non-abrasive cloth regularly.
When grime builds up to the point the lens has become cloudy and difficult to see through, wiping the lens down with a damp cloth will often do the trick.
Add a small drop of washing liquid for stubborn grime.
If you have auto-darkening shade lenses, be sure to clean the solar panel and sensors. Dust on the solar panel will prevent the battery from charging properly.
Dust on the sensors means the helmet won’t be able to detect the light from the arc as well and could prevent the auto-darkening feature from triggering.
After a point, it will no longer be possible to clean the lens — particularly the clear plastic lens on the front.
Always have spares handy to swap them out when needed. They were not expensive.
Which welding diopter should you pick?
If you have poor eyesight, you know how difficult it can be to wear a welding helmet and your glasses at the same time.
Even people whose eyesight is good enough to not need glasses can struggle with seeing with the welding helmet on.
That’s why diopter lenses are a great addition to your welding kit. Diopter lenses provide magnification that can help people see their work better without the need for glasses.
Whether it’s because your eyesight is poor, or you just want to get more detail on your work, diopter lenses can come in handy for most people.
Like with glasses, welding lens diopters come in a range of strengths, given as numbers. 2.0 diopters, for example, can be excellent for TIG welders who need to be able to see detail up close, but would otherwise need reading glasses.
Diopter lenses clip onto the inside of your welding mask (see question 1 for instructions on how to do so).
Not only will they provide visual clarity, but they can also help cut down on reflections and glare on your lenses.
How do you choose a welding lens?
The clear plastic impact-protection lens is usually one-size-fits-all. It’s simply there to protect the shaded lens from dust, sparks, scratches, and fumes.
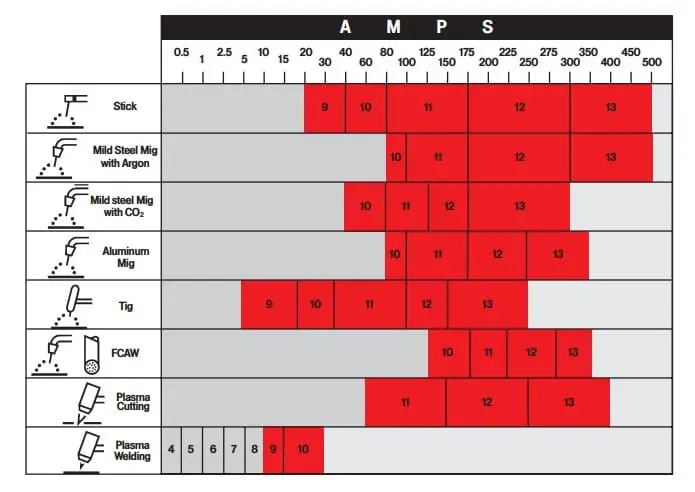
The kind of shaded welding lens you need will largely come down to the type of welding you’ll be doing, the material you’re welding, and the amps you’re using.
The strength of shading on a welding lens is given as a numerical value, with 4 being the lowest and 13 the highest (more on that below, “Which welding lens is darkest?”).
Below you’ll find which shade you need, for which amperage, for different types of welding.
This is why adjustable shade welding helmets are so popular.
Either manually or automatically adjusting the shade to best suit the type of welding you’re doing gives you greater flexibility while you work.
Which are the best welding lenses for pipeliner hoods?
A pipeliner hood is probably the most easily recognizable type of welding mask. It’s the plain, rounded face mask ubiquitous in workshops around the world.
Simple, affordable, and streamlined, it’s the go-to model of welding masks around.
When it comes time to replace a pipeliner hood’s shade lens, you’re pretty spoiled for choice.
Whatever your budget or welding needs, you’ll have no trouble finding a shade to suit.
Single shade, manually adjustable, automatically adjustable — you name it.
Miller provides many great lenses for pipeliner hoods; the Miller auto retails for around $90.
The optics are good and the build quality is reliable, but the lens has a tendency to get stuck in the darkened mode.
Optrel is another great brand. Also on the pricier end, their BO20 auto retails for around $130.
Its optics are clear and it doesn’t have the sticking issue of the Miller auto.
It deals with high temperatures very well and is exceptionally durable.
For my money, though, I like ArcOne. Their ArcOne T240 is the perfect middle ground between price and quality.
It was not too expensive, at just over $50. The optics are very clear, comparable to the more expensive models.
There’s a reasonable 5.25” viewing area, which is fine for most applications.
As an auto-darkening lens, it has two shade strengths; the “light state” is shade 3, while the “dark state” is 10.5.
This makes it suitable for a wide range of welding applications. You couldn’t use it for plasma cutting, but most other types of welding will be well handled by the lens.
If you require darker shades, ArcOne also produces various shade models to choose from.
Whatever the type of lens you need, I’d recommend looking at ArcOne products to start with.
Which are the best auto-darkening 2×4 welding lenses?
If you ever want to start a debate with welders, ask them if auto-darkening lenses are any good.
You’ll get those who swear by them, and those who think they’re a waste of money.
Personally, I like auto-darkening welding lenses — or at least, ones that do their job properly.
They should switch quickly between light and dark, not get stuck, and not have spots or dark patches even in “light” mode.
As with the pipeliner hood lenses above, you’re spoiled for choice with auto-darkening lenses. Miller and ArcOne are the top brands to look at.
Wens Lens also produces some very nice blue lenses if you don’t like green, but their build quality can be very inconsistent.
In line with what I said about the pipeliner lenses, I vouch for ArcOne auto-darkening lenses.
Their S240 range features very clear optics, generous viewing space, and durability.
So long as you have a good protective lens over them you’ll be using these for quite a while before replacing them.
The S240 lenses come in a range of shades. S240-10, for example, auto-darkens to shade 10. S240-9 auto-darkens to shade 9, etc.
Some people report that the S240-10 is more like a shade nine; you may want to buy a shade higher than you intend to use.
Considering how clear the lenses are to see through, you’re not actually doing yourself a disservice if it does end up being a shade darker than you wanted.
Perhaps the only drawback to the ArcOne S240s is that sometimes the lens can take a little longer to switch to Dark Mode.
It’s advertised as 0.5 milliseconds, but sometimes I still get flashed when arcing up.
It’s usually advisable to close your eyes as you ignite the spark (or at least blink!), just so you don’t get flashed.
Which welding lens is the darkest?
Lens shades are given in values from 0-13. Welding lenses specifically range from 4-13 — anything less than 4 is effectively useless.
Auto-darkening lenses usually have shade 3 set as the “light” mode for when you’re not working, before switching down to 9 or higher for use.
Shade 13 is the darkest. It’s used for high-amperage welding (see above, “How do you choose a welding lens?”).
It provides the most protection against incredibly bright arcs and sparks at close distance. It also protects against UV radiation generated at these high amperages.
With such a high level of shade, you can end up getting lenses that have very poor visibility.
Weldcote makes excellent dark shade lenses; their shade 13 lens provides excellent clarity even at the highest shade level available.
Many auto-darkening shade 13 lenses lack clarity.
You can find many comments from welders saying they’d rather put this single-shade lens on the helmet and just raise and lower the visor, than struggle to see through auto-darkening.
When people are trading convenience for quality, you know it’s a good lens.
What shade of welding lens do you need to look at the sun?
Your welding arc is bright, but the sun is usually brighter (some plasma cuts can actually exceed the brightness of the sun at close range).
If you’re interested in watching the next solar eclipse through a welding helmet or just want to see that fiery ball of gas with your own eyes, you’ll need the darkest shade possible, so pick shade 13.
The shade 13 Weldcote lens mentioned above is perfect for this — it provides the shade needed to safely look at the sun, as well as the clarity to see all the amazing details revealed during a solar eclipse.
Final Thoughts
Welding lenses are one of the most essential pieces of PPE when welding, whether you’re a hobbyist or a pro.
Choosing the right lens, keeping it clean, and caring for it properly, are all important parts of maintaining your gear and keeping yourself safe while working.
Armed with the knowledge above, you’re on your way to safer, more productive welding in the future.